AX 2012 Creating the SSRS Report– Precision Design
In this post, we will see how we can build a report using precision design. A precision design is like a pre-printed format where the placing of report controls, the design and the spacing matters a lot.
A precision design is the standard SSRS report designer following the same principles, rules and requirements as are found in a SQL Server Business Intelligence Studio SSRS designer.
We will print Customer Id, Customer name and Balance by Precision Design.
I will also show how we can use some inbuilt parameters to display some generic information like page number, execution date and time etc.
Create the Queries from AOT
Step 1 : Open the AX -> AOT -> Queries
Queries: RBCustomer
Step 2 : Drag and drop the Table: CustTable to the Query Datasource of the RBCustomer Queries , and the change the field properties 'Dynamic' to Yes as shown above and save it.
Step 3 : Open Visual Studio , Click on "New Project" , Expand the Templates - > Select Microsoft Dynamics AX -> Select "Report Model"
Step 4: Enter the report name as "RB_CustomerReportProject" and Click on the Ok button. The new visual studio project will be created.
Step 5: Right Click on the project , Move your cursor to "Add" -> Select the "Report " menu. The new report will be created as shown below.
Step 6: Goto the properties and rename the report as RB_CustomerReportQuery.
Step 7: Click on Add Dataset
Step 8: Change the Name as "Customer" in the property window.
Step 9: Click on the small button available on the properties "Query"
Step 10: List of Queries available in the AOT will be opened , select the query "RBCustomer " created for this demo as shown below.
Step 10 : Here you can select required fields. Either you can select all fields or a subset.
Step 11 : Expand All Fields nodes under the CustTable node to select “AccountNum”
Step 12: Expand Node “All Display Methods” and select “name” and “openBalanceMST” and Click “Ok”
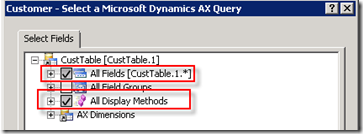
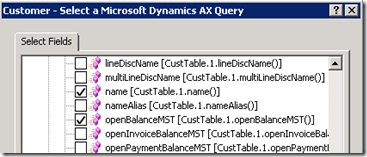
Step 13: This will generate the required fields for the dataset
Step 14: Now Right click on the designs node, select Add and then “Auto Design”. This creates a new Precision Design
Step 15: Now right click on new Design and select “Edit Using Designer”
- This opens up the SSRS Designer (same as standard SSRS)
- You can see the standard Report Item tool bar from where you can drag and drop the controls onto the designer surface
Step 16 : Now from the controls tool bar, drag and drop the Table control onto the Report Designer , Select the Tablix and then set the DataSetName property = “Customer”
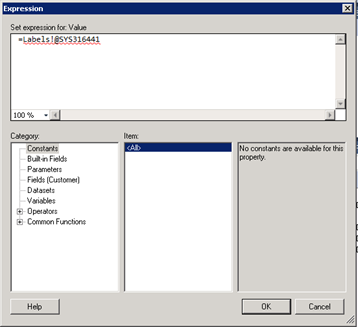
Step 17 : Now let us specify headers, Select one text box in the header section and right click, then select “Expression…”
Step 19 : Here write the following in the space “Set expression for: Value” – =Labels!@SYS316441
This displays the header text using the labels in AX. This label is “Customer”
This displays the header text using the labels in AX. This label is “Customer”
Step 21 : 2nd Column Header(Name) : =Labels!@SYS117778
Step 22 : 3rd Column Header (Amount): =Labels!@SYS62867
Specifying the data for the table
Step 23 : Now in the data row, move the mouse to first text box and you should see a button on the right side that looks as shown below

Step 25 : Alternatively, you can right and use “Expression…” box to specify the data fields. The expression box looks as shown below:
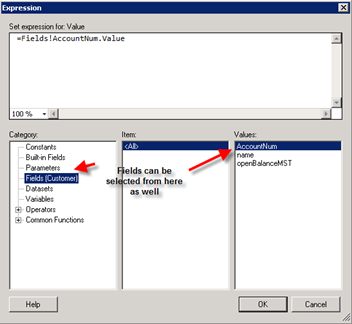
Now that the data is ready, we will go ahead and change the look and feel of the report
Formatting the table
You can specify the lots of formats using the properties windows like Background color, Font type color etc. You can also use the formatting tool bar above to format the data

Go ahead and specify the borders for the table for each row. Then change the background of the Header row. Make the text in the header row as center aligned and make the font as bold
Select the table rows one by one and change the font to “Segoe UI” and Font Size to “8pt”. Now your table looks as shown below:

Step 26 :Now we will go ahead and a Page Header and Page Footer. In Page Header, we will add Report name, Report Title and Execution Date and Time. In the Page Footer, we will add the Page Numbers in the format (Page of Total Pages)
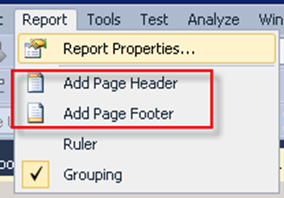
To enable Page Header and Footer, in the Report menu select “Add Page Header” and “Add Page Footer” options
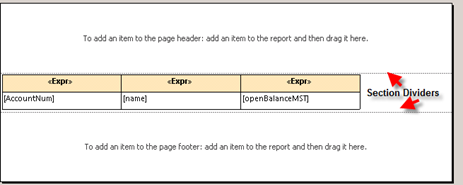
Step 27: Now drag three text boxes from tool box and drop onto the Page Header area. Place two text boxes on the left hand corner and one on the right hand corner as shown below. Drag and drop one text box in the center of the Page footer as shown below.
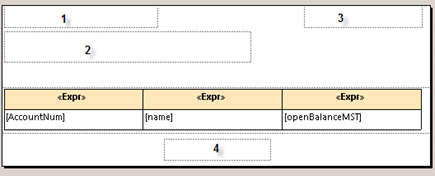
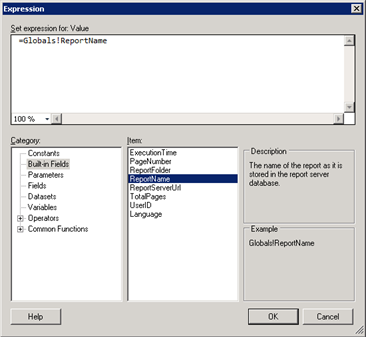
Step 28 : Select the first text box, Open the expression box and in the Category section, select “Built-in Fields. Now double click on “ReportName” field and it should add the report name to value section
Step 29 : In the same way select “ExecutionTime” in third text box. For report title, Type in “Customer balances” in the second text box
Step 30 : In the footer section, select the 4th text box and type the expression ‘=Globals!PageNumber & ” of ” & Globals!TotalPages’
Apply formatting as required. Now you should see the design as follows
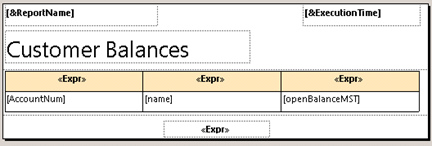
Step 31 : Now close the designer, add the report back to AOT (along with the model) and deploy the report from within AOT.
Step 32 :Create a new menu item
Go to AOT –> Menu Items –> Output, Right click and select “New Menu Item”. Set following properties
Step 33 : Now run the report and the report will be seen as shown below:
Based on your select , you will get the output as shown below.
AX Document Handling
Dynamics AX : Document handling
The following solution is to use the document handling feature of AX and generate a word document by populating data into a word template. Following is the detail on how to do it .
When we create a new word document through document handling , we can transfer data from tables in Microsoft Dynamics AX to bookmarks in the new document. This is done by creating a template with some standard text and some bookmarks where the data from tables are to be inserted. For example we can transfer the address and contact information for a customer to the letter head in a Microsoft Word document when creating a new letter for that customer.
Prepare a Word template :We need to create a Word template with bookmarks where the data should be inserted. Then we set up the document type by linking the document type to the template and by adding the data fields to be transferred to the individual bookmarks.
Step A : Create a new Word template
1. From the Start menu, click All Programs > Microsoft Office > Microsoft Office Word.
2. In the new template, add the text and graphics we want to appear in all new documents that we base on the template.
3. Place the cursor where we want to insert data from Microsoft Dynamics AX and then click Insert > Bookmark.
4. Type a meaningful name for the bookmark and click Add.
5. Repeat step 3 through 4 for each bookmark that we want in the template.
6. On the File menu, click Save As.
7. In File name, type a name for the new template.
8. In Save as type, click Document Template, and then click Save.
Note : It is important to use a table where more than one row of data is needed. e.g. if we are expecting to insert more than one invoices for a vendor as shown in the above screen shot. This will help maintain the format when the data is populated by the system. Otherwise the data will be distorted.
Step B : Link the template to a document type
1. Click Basic > Setup > Document management > Document types.
2. Select the document type that we want to link to a template.
3. Click Options.
4. In the Table list, select the table to associate with the template.
5. In the Template file list, type the path to the template file or use the browse button to locate the file on the computer or network.
Class description: Create Word document via COM
Group: Document
Step C : Add bookmark information to table fields
1. Click the button “Option”.. In the Options form, On overview tab give the name of the table and path of the template file
select the table that is linked to the template that we want to use.
2. Select the Fields tab.
3. Press CTRL+N to add a field to be transferred.
4. In the Data table list, select a table to get data from.
5. In the Data field list, select the data field to get data from.
6. In Bookmark, type the name of the bookmark we have inserted in the document where the data will be inserted.
7. Select Hard return to insert a line break after the data inserted (optional).
8. Repeat step 3 through 7 to add more data fields to the list.
Note : The table we get the data from does not have to match the table selected on the Overview tab, but the two tables have to be related.
The Document handling feature can only create one letter per invoice.
On Field tab select the AX table and fields as shown below in the screen shot . For each field give the Bookmark from the template.
Step D : Test the report
Go to vendor master and select a vendor whose invoices have been pending / on hold.
Click document handling button. Indocument handling click the Button New and select the document type created in previous Step B.
A word document will be created with data for the vendor
Verify the data on the document. Pls note that the invoice number date and amount fields are nicely aligned . If the bookmarks had not been in a table in the template then the invoice details would have been distorted. ( try using a template with bookmarks without table and see yourself )
I hope the above will be of help to many AX consultants in avoiding a few report customisations.
AX 2012: Create Batch Job Using SysOperation Framework
In this post we’ll learn how to create a very basic custom Batch job using SysOperation framework. We’ll use the base controller class SysOperationServiceController and develop a custom service operation class to achieve the goal.
Requirement:
To create a Batch job to mark all the records as processed in a custom table MAKSalesTable.
Project overview:
The project shows how simple yet powerful the SysOperation framework is for developing custom batch jobs as opposed to RunBase framework since the minimum development needed to create a fully functional batch job is to create a custom service operation class defining a single method giving the implementation for the batch operation to be performed.
Development steps:
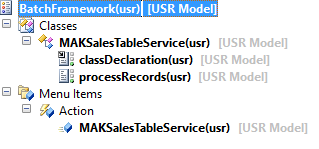
1. Create a service operation class MAKSalesTableService having the following class declaration:
class MAKSalesTableService
{
}
2. Create a new method in the class giving a suitable name like processRecords having the following definition:
[SysEntryPointAttribute(false)]
public void processRecords()
{
    MAKSalesTable   makSalesTable;
    int             counter = 0;

    //Determines the runtime
    if (xSession::isCLRSession())
    {
        info('Running in a CLR session.');
    }
    else
    {
        info('Running in an interpreter session.');

        //Determines the tier
        if (isRunningOnServer())
        {
            info('Running on the AOS.');
        }
        else
        {
            info('Running on the Client.');
        }
    }

    //Actual operation performed
    while select forUpdate makSalesTable
    {
        ttsBegin;
        makSalesTable.Processed = NoYes::Yes;
        makSalesTable.update();
        ttsCommit;

        counter++;
    }

    info(strFmt("Successfully processed %1 records.", counter));
}
3. Create an action menu item MAKSalesTableService pointing to SysOperationServiceController.
4. Set the parameters of the action menu item to the service operation just created,MAKSalesTableService.processRecords.
5. Compile the service operation class and generate incremental IL.
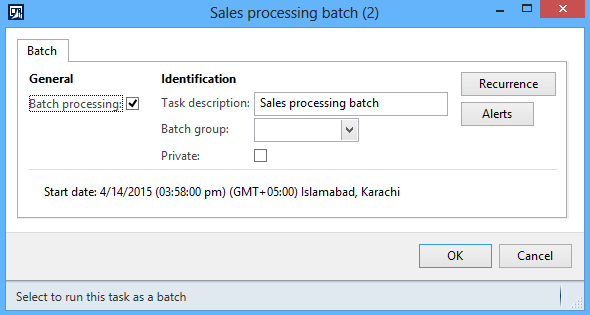
6. Click on the action menu item to run the batch job. Check the Batch processing checkbox to run the job in CLR runtime which is the batch server execution environment.
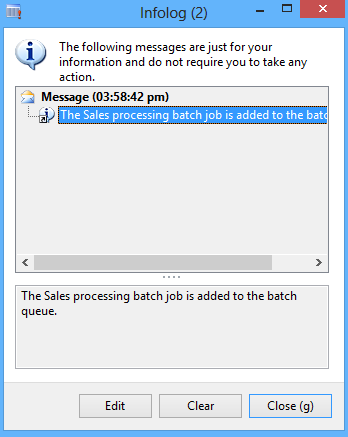
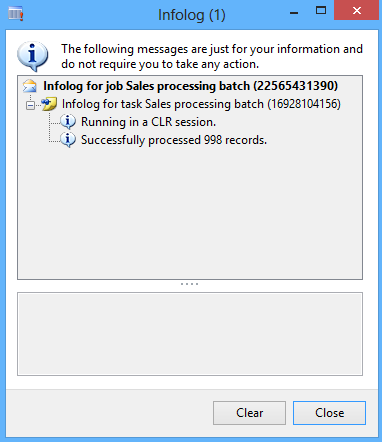
7. Click System administration > Inquiries > Batch jobs to view the status of the job. You may also click on the Logbutton to view the messages written to infolog during the job execution.
Preconditions:
Before running the batch job, all the records were unprocessed:
Post conditions:
After running the batch job, the list page shows that all the records are now marked as processed:
Create an Intercompany sales order using X++ code in AX 2012
public void interCompanySO(Args _args)
{
SalesTable salesTable,salesTableLocal;
salesTableLocal= args.record();
salesTable= SalesTable::findRecId(salesTableLocal.RecId, true);
ttsBegin;
if (salesTable.SalesType == SalesType::Journal)
{
salesTable.SalesType = SalesType::Sales;
salesTable.Update();
}
ttsCommit;
// code to create a intercompany Sales Order and purchase order.
TradeInterCompany::autoCreateOrder(salesTable);
}
{
SalesTable salesTable,salesTableLocal;
salesTableLocal= args.record();
salesTable= SalesTable::findRecId(salesTableLocal.RecId, true);
ttsBegin;
if (salesTable.SalesType == SalesType::Journal)
{
salesTable.SalesType = SalesType::Sales;
salesTable.Update();
}
ttsCommit;
// code to create a intercompany Sales Order and purchase order.
TradeInterCompany::autoCreateOrder(salesTable);
}
DAX2012R3CU9 – DIXF – Automate import/export without customizations
The Microsoft Dynamics AX 2012 Data
Import/Export Framework(DIXF) is an AX module import and export data in
Microsoft Dynamics AX. We often use it in data migration projects to load
legacy data from old systems. I was wondering if I could use DIXF as an automated
integration, without any customizations. I wanted to see if I could have a
folder where new customers are dropped in a folder, and then the DIXF
automatically picked up the file, and imported it.
My first step is to have a small and
minimalistic Excel sheet, that users can paste in the new customer records.
This is how my Excel sheet looks like:
Most of these customers exists from
before, but the last record is a new customer that don’t exists in my database.
The
recommended process of setting up an import/export process is described here.
The first step is to create a source
data format:
I then determine what entity to use,
and create a target entity
When I do this, the mapping is done
automatically for me, and I don’t have to understand all the database related
complexity.
My next step is to create the
processing group
I then click on the Entities in the
processing group, and I select my created entity and that I want to use my
created Excel source data format. I also select a sample file to see if the
mapping is OK.
I then just check the mapping from
Excel to the staging format, and make the necessary corrections.
My next step is to go back to the
processing group, and to make the necessary batch job for automatic processing.
As you see here, I set the “type” to
Directory, that DIXF will scan for new files. I also specify directories for
processing, completed and error. I have therefore created the following
directory structure for each integration:
The other important thing is the
“Execute target step”. This this used for also executing the step that
transfers data from the staging table to the target tables.
I then want this to be work in batch,
so I enable the batch processing.
And then I need to wait for an entire
minute……… I then saw that the file was moved from the 1_new folder, and ended
up in the ¤_Completed folder.
I also see in the execution history,
that the files was imported into the staging tables, and then imported into the
target tables.
In my customer overview, I now see
that I have a new customer, but is also made sure that other related data as addresses,
and phone etc was created.
This concludes how you can use DIXF
to automatically import data. What I can now do to import data, is just to
create my Excel file, and then dump it into the right folder (.\1_New), and
then the batch system take care of the test.
If
you wonder all entities that are “out-of-the-box” supported from Microsoft,
then take a look here. If still
something is missing, you can always ask a developer to assist in creating the
DIXF entities you need.
Happy
DIXF’ing J
Subscribe to:
Posts (Atom)
D365 F&O X++ code Update_Recordset and SkipDataMethods still calling update method
D365 F&O X++ code Update_Recordset and SkipDataMethods still calling update method It sounds like you're encountering an issue where...
-
X++ code to read the Excel file static void RB_ReadExcel(Args _args) { SysExcelApplication application; SysExcelWorkbooks w...
-
//Create a new job and paste the code static void RB_ReadTextFile(Args _args) { Filename ...
-
// Create a job and paste the below code .. static void RB_validateEmail(Args _args) { Str email; Str MatchEmail...


