D365 F&O Release Pipeline Step by Step Configuration Without ISV's


Step-by-Step Guide: Creating D365FO Build and Deploy Pipelines

Azure DevOps Build Pipeline

I will walk through the standard procedures for setting up a D365FO Azure DevOps build pipeline.

Microsoft References:

Before we begin, please refer to the following documentation for context:

Step 1:


Deploy the Build Server from LCS:


Login to Azure DevOps and install  Dynamics 365 Finance and Operation tools:


Install the «Dynamics 365 Finance and Operations Tools» extension


Step 2 :  Create personal access token (PAT)


Navigate to DevOps > User Settings > Personal Access Tokens. Scopes: Full Access, Expiration (choose the date as you wish, longer the better).


Step 3: Navigate to Azure DevOps  >> Pipeline


Step 4:  Clone the pipeline and name it as you wish (Example: Build Dev)


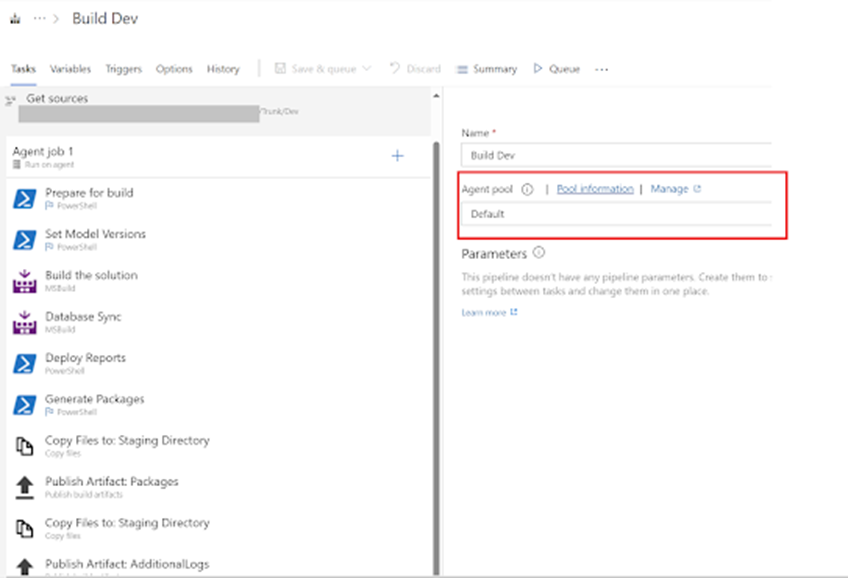
Step 5  Edit the Build Dev Pipeline:


Choose the Agent pool:


Step 6:  Provide the repo branch path on the server path column.


Step 7:  Modify the repo branch name if needed:


Rest of the pipelines are standard. We will proceed with the Release pipeline.


Steps to create a new release pipeline.


Step 1: Navigate to Azure DevOps >Pipeline > Release.


Step 2:  Click on the New , to create a new release pipeline


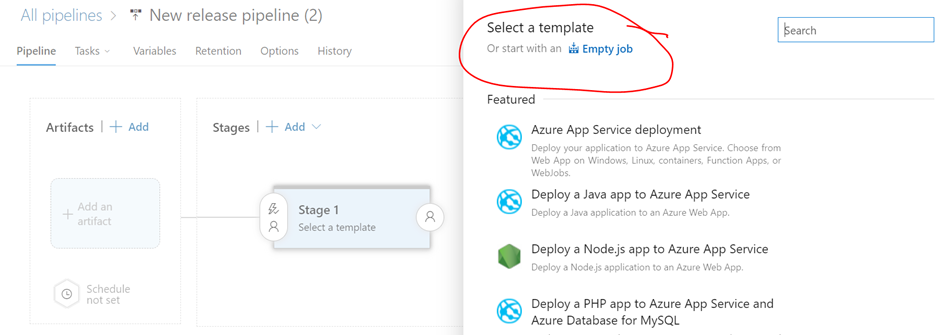
Step 3 : Select Empty Job


Step 4:  Rename the Release Pipeline, Click  “Add an artifact”


Step 5:  Select the Project Name & Source Build Pipeline


Step 6:   Add the task in Stages.


Step 7:   In total we need 3 stages as shown below.


Ø  Select the Agent pool


Stage 1 :  Select “Install MSAL.PS” to enable authentication. 


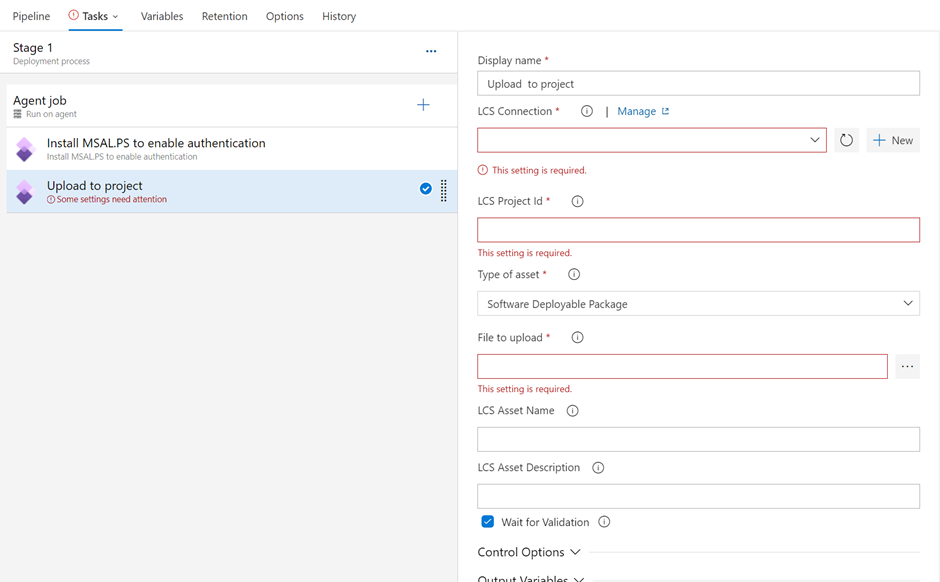
Stage 2:  Select “Dynamics Lifecycle Services (LCS) Asset Upload”


Fill the details as shown below.


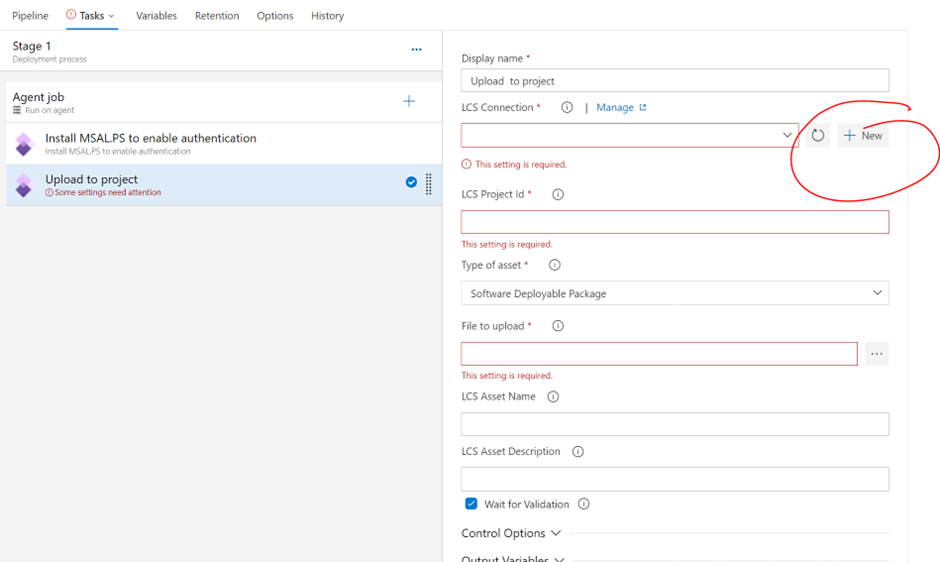
Click on +New on the LCS Connection


Fill the details for the LCS connection.


File to upload:  Click on the three dots and select the AXDeployableRuntime.

To automate the process and to select the latest build generated by the pipeline use the _$(Build.BuildNumber).zip  as shown in the below command


$(System.DefaultWorkingDirectory)/_Build Dev/Packages/AXDeployableRuntime_XXXXXXX_$(Build.BuildNumber).zip


LCS Asset Name: Dev branch -$(Release.ReleaseName)


LCS Asset Descritpion: Dev branch - $(Release.ReleaseName) - $(Build.BuildNumber)


Enter the name on the Reference name: “OutputVariableName”


Stage 3: Select “Dynamics Lifecycle Services (LCS) Asset Deployment”


Fill the mandatory fields on the stage 3:


LCS Environment Id :  Fill the details of the environment you plan to deploy. The Environment Id details found in LCS.

LCS File Asset Id: $(OutputVariableName.FileAssetId)


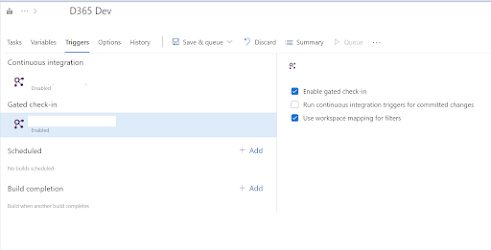
You can setup the Gated Check-In:


D365 F&O -The permission 'KILL DATABASE CONNECTION' is not supported in this version of SQL Server. Alternatively, use the server level 'ALTER ANY CONNECTION' permission. Error SQL72045: Script execution error. The executed script: GRANT KILL DATABASE CONNECTION TO [ms_db_configreader];

 Error message : Receive the following error while importing a bacpac to a Dev environment

Error SQL72014: Framework Microsoft SqlClient Data Provider: Msg 4630, Level 16, State 1, Line 1 The permission 'KILL DATABASE CONNECTION' is not supported in this version of SQL Server. Alternatively, use the server level 'ALTER ANY CONNECTION' permission.

Error SQL72045: Script execution error.  The executed script:

GRANT KILL DATABASE CONNECTION TO [ms_db_configreader];


Steps to resolve the issue:

Step 1: 

Rename the BACPAC file to .zip

Go to the folder where you have saved your BACPAC file and rename the BACPAC file with a .zip extension


Press "Yes" to convert the .bacpac file to zip file.

Step 2 : Open zip file ,  


Step 3: Copy the model.xml file into the different location

Step 4: O
pen it in notepad editor.


Step 5.  Delete the entire Element tag which contains " Grant.KillDatabaseConnection " 


 Step 6. After deletion of the element type mentioned in Step 5. it look like below.


Step 8: Download the latest SqlPackage file from the below link:

https://learn.microsoft.com/en-us/sql/tools/sqlpackage/sqlpackage-download?view=sql-server-ver16


Step 7:  Rename the the file modelCopy.xml  and paste it in the SqlPackage folder.


Step 8: Rename the zipfile to bacpac file  (reverting back the changes from step 1)


Step 8: Login to command prompt as administrator. 

Step 9:  Navigate to the downloaded SQLPackage folder and run the below command.


SqlPackage.exe /a:import /sf:"J:\MSSQL_BACKUP\AxDB.bacpac" /tsn:localhost /tdn:AXDB_New /p:CommandTimeout=1200 /TargetTrustServerCertificate:True /mfp:"ModelCopy.xml" 

This will resolve your issue of Importing the Bacpac file into D365 F&O Tier 1 environments


D365 F&O Management Reporter Troubleshoot issues opening Report Designer


Issue 1 - Report Designer doesn't start when you select "New" or "Edit"

Resolution

Check the Event Viewer:   If the Issue related to Change Tracking :

Run the below script:

ALTER DATABASE AxDB SET CHANGE_TRACKING = ON (CHANGE_RETENTION = 2 DAYS, AUTO_CLEANUP = ON)

IF related to User Permission:

To solve this issue, follow these steps:

  • In Internet Explorer, select Settings > Internet Options > Security > Trusted Sites > Sites. In the Add this website to zone field, enter \*\.dynamics.com, and then select Add.

  • In Internet Explorer, select Settings > Internet Options > Security > Trusted Sites. In the area labeled Security level for this zone, change the option to Medium-Low.

  • Disable the pop-up blocker in your browser.

  • Install Microsoft .NET Framework 4.7.2 or higher to workstations.

  • If you're using the Chrome browser, you must install the ClickOnce extension to download the Report Designer client. If you're running Chrome in incognito mode, make sure the ClickOnce extension is enabled for incognito mode. For more information about the Chrome ClickOnce extension, see System requirements for cloud deployments.

  • If you're using Microsoft Edge with the Chrome browser, you don't need to install the ClickOnce extension for Microsoft Edge Chromium. However, you must enable the ClickOnce option to download the Report Designer client. If you're running incognito mode, make sure the ClickOnce extension is enabled for incognito mode.

    1. Open a new browser in Microsoft Edge.
    2. Enter edge://flags and select Enter.
    3. Search for the ClickOnce Support option or use this direct link: edge://flags/#edge-click-once.
    4. Set the drop-down menu option to Enabled.
    5. Select Restart Browser.


Management Reporter Connection Issue

 
  1. Issue: Unable to connect to Management Reporter and received below mentioned errors:


  1. Taken UAT DB Write Access to run the script shared by Microsoft:

Script #2: Script should run on the AxDB:

UPDATE FINANCIALREPORTINGSETTINGS SET SETTINGVALUE = 0 WHERE SETTINGKEY = 'DisableMaps';
IF @@ROWCOUNT=0 INSERT INTO FINANCIALREPORTINGSETTINGS(SETTINGVALUE, SETTINGKEY) VALUES (0, 'DisableMaps')

Step#2:Re-start MR services after running the above script
  1. Run the script in UAT AxDB


  1. Executed the script:

 
  1. Restart the MR Service from LCS
  2. Click on Restart Service


  1. Select the Financial Reporting Service
  1. Again, try to open the Financial Reports:


D365 F&O Release Pipeline Step by Step Configuration Without ISV's

  Step-by-Step Guide: Creating D365FO Build and Deploy Pipelines Azure DevOps Build Pipeline I will walk through the standard procedures...