Create or Update a Contact Information for a customer/vendor in X++ [AX 2012 R3]


Create or Update a Contact Information for a customer/vendor in X++ [AX 2012 R3]


static void RB_SupplierAddress_RoleUpdate(Args _args)
{
    VendTable                           VendTable = VendTable::find('‪‪‪PL00001');
    LogisticsElectronicAddress          logisticsElectronicAddress;
    container                           defaultRole = map2Con(LogisticsLocationEntity::getDefaultLocationRoleFromEntity(tableNum(DirPartyTable)));
   
   
    ttsBegin;
    logisticsElectronicAddress.Type = LogisticsElectronicAddressMethodType::Email;
    logisticsElectronicAddress.Locator = 'ramesh.balakrishnan@ao.com';
   
    logisticsElectronicAddress.Location = DirPartyLocation::findOrCreate(VendTable.Party, 0).Location;

    logisticsElectronicAddress = LogisticsElectronicAddress::findOrCreate(logisticsElectronicAddress);
   
    logisticsElectronicAddress = LogisticsElectronicAddress::findRecId(logisticsElectronicAddress.RecId, true);
   
    logisticsElectronicAddress.Description = "Official Email";
   
    logisticsElectronicAddress.IsPrimary = NoYes::Yes;
   
    logisticsElectronicAddress.update();
 
    LogisticsEntityLocationRoleMap::createEntityLocationRoles(tableNum(LogisticsElectronicAddressRole), logisticsElectronicAddress.RecId, conPeek(defaultRole, 1), true);
   
    info(strFmt("Created/updated phone number [%1] for customer %2.", logisticsElectronicAddress.Locator, VendTable.AccountNum));
    ttsCommit;
}

AX 2012 R3 - Fastest way to do full compile

Steps to do full compile in the fastest way in AX 2012 R3


Open the command prompt :

Traverse the path :

C:\Program Files\Microsoft Dynamics AX\60\Server\XXXXXXX\bin>
axbuild.exe xppcompileall /s=01 /altbin="C:\Program Files (x86)\Microsoft Dynamics AX\60\Client\Bin" /log:"C:\Temp

Here is an example command line for AxBuild.exe that might match the command line you need in your particular environment. The line is artificially wrapped here for better display.


Modify/ Update the Default Dimension in AX 2012 R3 Using X++ Code.


Modify/ Update the Default Dimension  in AX 2012 R3 Using X++ Code.

static void RB_ModifyDimension(Args _args)
{

    ItemId      itemId;
    str         costCentre;
 

    DimensionAttributeValueSetStorage   dimStorage = new DimensionAttributeValueSetStorage();
    DimensionAttribute                  dimAttribute;
    DimensionAttributeValue             dimAttributeValue;
    DimensionDefault                    defaultDimension;

    #define.CostCentre('CostCentre')

    itemid     =  "TESTItem";
    costCentre = '2000';

   
    ttsBegin;
    if (itemid && costCentre)
    {
       
        defaultDimension    = InventTable::find(itemId).DefaultDimension;
        dimStorage          = DimensionAttributeValueSetStorage::find(defaultDimension);
        dimAttribute        = DimensionAttribute::findByName(#CostCentre);
        dimAttributeValue   = DimensionAttributeValue::findByDimensionAttributeAndValue(dimAttribute, costCentre, true, true);

        dimStorage.addItem(dimAttributeValue);
        // Dimension modified or updated including costcentre as well.
        defaultDimension = dimStorage.save();
       
        info(strFmt("Modified/ Updated Default Dimension %1", defaultDimension));
       
    }
    ttsCommit;
                 
}


X++ code to Merge & Update Sales Order & Sales Line Financial Dimension.


X++ code to update Sales Order & Sales Line Financial Dimension.


static void RB_SLineFinDimensionUpdate(Args _args)
{
    SalesTable                          salesTable,salesTableUpd;
    SalesLine                           salesLine,salesLineUpd;
    CustAccount                      custAccount;
    DimensionDefault             defaultDimension,itemDefaultDimension,custDefaultDimension;


    salesTable   =  SalesTable::find('10000');
    salesLine    =  salesLine::find(salesTable.SalesId,1,true);

    if (salesLine)
    {
        itemDefaultDimension    =   InventTable::find(salesLine.ItemId).DefaultDimension;
        custDefaultDimension    =   CustTable::find(salesTable.CustAccount).DefaultDimension;

        defaultDimension        = DimensionDefaultingService::serviceMergeDefaultDimensions(custDefaultDimension,itemDefaultDimension);

        update_recordSet salesTableUpd
            setting defaultDimension =  custDefaultDimension
            where salesTableUpd.salesId == salesTable.SalesId;

            update_recordSet    salesLineUpd
                setting defaultDimension = defaultDimension
                where salesLineUpd.RecId == salesLine.RecId;

    }

}

How to: Add Filter Controls to a Simple List Form [AX 2012 R3]

How to: Add Filter Controls to a Simple List Form [AX 2012 R3]

 Step 1: 
Create a form filter 


Step: 2

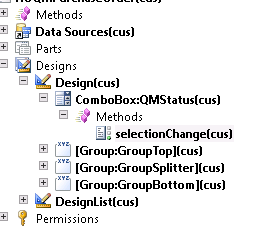
Step: 3

int selectionChange()
{
    int ret;
    ret = super();

    QMPurchTable_ds.executeQuery();

    return ret;

}

Step: 4 
Write the below on FORM Datasource.

// If you are filtering used Enum Values. Please find the code below.
public void executeQuery()
{
   
    AXStatus      qmStatusExe; // EnumValue

   // converting the string value to enum
    qmStatusExe = str2enum(AXStatus,QMStatus.valueStr()); // values from the filter.

   qr =  SysQuery::findOrCreateRange(QMPurchTable_q.datasourceTable(tableNum(QMPurchTable)),fieldNum(QMPurchTable,QMStatus));

    if (qmStatusExe == AXStatus::Open)
    {
        qr.value(queryValue(AXStatus::Open));
    }
    else if (qmStatusExe == AXStatus::Closed)
    {
        qr.value(queryValue(AXStatus::Closed));
    }
    else
    {
        qr.value(SysQuery::valueUnlimited());
    }
    qr.status(RangeStatus::Locked);

    super();

}


D365 F&O Release Pipeline Step by Step Configuration Without ISV's

  Step-by-Step Guide: Creating D365FO Build and Deploy Pipelines Azure DevOps Build Pipeline I will walk through the standard procedures...